![Pro4all Logo-1.png]](https://support.pro4all.nl/hs-fs/hubfs/Pro4all%20Logo-1.png?height=50&name=Pro4all%20Logo-1.png)
Customerdata configuration
1. Click Customerdata configuration under Tools in the Speedbuttons.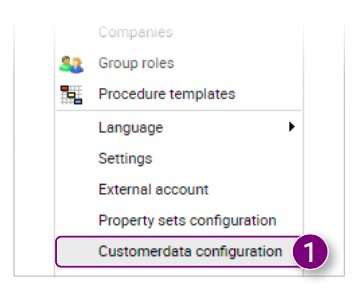
The Customerdata Management window will open. Here you will see an overview of all customizable customer data for the domain. 2. Click UPLOAD FILE to select an image for the QR code page if the version is up to date.
3. Click RESET TO DEFAULT to return the setting to the default settings.
4. Click UPLOAD FILE to select an image for the QR code page if the version is outdated.5. Click RESET TO DEFAULT to return the setting to the default settings.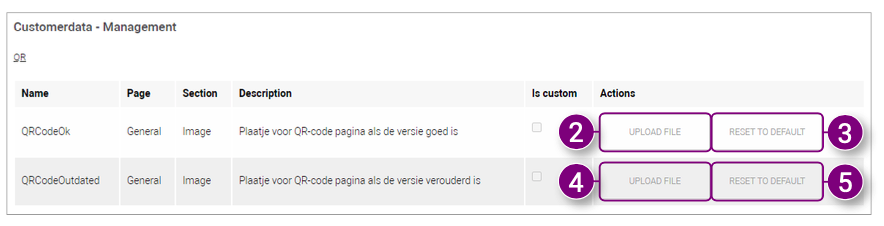 6. Enter a text for the navigation bar in Docstream and click Save.
7. Click RESET TO DEFAULT to return the setting to the default settings.
8. Enter a 6-digit hex code for the color of the text in the navigation bar and click Save.
9. Click RESET TO DEFAULT to return the setting to the default settings. 10. Enter a text for the navigation bar in Docstream and click Save.
11. Click RESET TO DEFAULT to return the setting to the default settings.
12. Enter a 6-digit hex code for the color of the text in the navigation bar and click Save.
13. Click RESET TO DEFAULT to return the setting to the default settings.
 14. Click UPLOAD FILE to select a background image for the title bar. 15. Click RESET TO DEFAULT to return the setting to the default settings. 16. Enter a 6-digit hex code for the color of the title bar, buttons and navigation bar on the login page and click Save. 17. Click RESET TO DEFAULT to return the setting to the default settings.
 18. Click on UPLOAD FILE to select a header image for the reports. 19. Click RESET TO DEFAULT to return the setting to the default settings. 20. Enter a 6-digit hex code for the color of the navigation bar and click Save. 21. Click RESET TO DEFAULT to return the setting to the default settings.
23. Click RESET TO DEFAULT to return the setting to the default settings.
24. Click UPLOAD FILE to select a header image for almost everything in Docstream.
26. Click UPLOAD FILE to select a header image for regular messages.
27. Click RESET TO DEFAULT to return the setting to the default settings.

29. Click RESET TO DEFAULT to return the setting to the default settings.
30. Click UPLOAD FILE to select an icon for the navigation bar on the login page.

32. Enter a text for the navigation bar on the login page and click Save.
33. Click RESET TO DEFAULT to return the setting to the default settings.
34. Click UPLOAD FILE to select a logo for the navigation bar on the login page.
35. Click RESET TO DEFAULT to return the setting to the default settings.
36. Enter a text for the slider on the login page and click Save.
37. Click RESET TO DEFAULT to return the setting to the default settings. 

23. Click RESET TO DEFAULT to return the setting to the default settings.
24. Click UPLOAD FILE to select a header image for almost everything in Docstream. 25. Click RESET TO DEFAULT to return the setting to the default settings.
26. Click UPLOAD FILE to select a header image for regular messages.
27. Click RESET TO DEFAULT to return the setting to the default settings.

29. Click RESET TO DEFAULT to return the setting to the default settings.
30. Click UPLOAD FILE to select an icon for the navigation bar on the login page.

32. Enter a text for the navigation bar on the login page and click Save.
33. Click RESET TO DEFAULT to return the setting to the default settings.
34. Click UPLOAD FILE to select a logo for the navigation bar on the login page.
35. Click RESET TO DEFAULT to return the setting to the default settings.
36. Enter a text for the slider on the login page and click Save.
37. Click RESET TO DEFAULT to return the setting to the default settings. 
29. Click RESET TO DEFAULT to return the setting to the default settings.
30. Click UPLOAD FILE to select an icon for the navigation bar on the login page. 31. Click RESET TO DEFAULT to return the setting to the default settings.38. Enter a text for the header of the slider on the login page and click Save. 39. Click RESET TO DEFAULT to return the setting to the default settings. 40. Click UPLOAD FILE to select an image for the slider on the login page. 41. Click RESET TO DEFAULT to return the setting to the default settings.

